1. 前言
现如今,前后端分离已经逐渐成为互联网项目一种标准的开发方式,前端与后端交给不同的人员开发,但是项目开发中的沟通成本也随之升高,这部分沟通成本主要在于前端开发人员与后端开发人员对Web API接口的沟通。
传统方式是采用手写API文档的方式,这会带来许多的问题
- 文档需要更新的时候,需要再次发送一份给前端,也就是文档更新交流不及时。
- 接口返回结果不明确
- 不能直接在线测试接口,通常需要使用工具,比如postman
- 接口文档太多,不好管理
Swagger2 就可以很好地解决,它可以动态生成Api接口文档,降低沟通成本,促进项目高效开发。当然也不能说Swagger2就一定是完美的,当然也有缺点,最明显的就是代码移入性比较强。
接下来就进行Swagger2的学习
项目代码: https://github.com/ShangguanHong/SpringBootDemo/tree/master/springboot-swagger2
2. 依赖
 1
 2
 3
 4
 5
 6
 7
 8
 9
10
11
12
|
        <!-- https://mvnrepository.com/artifact/io.springfox/springfox-swagger2 -->
        <dependency>
            <groupId>io.springfox</groupId>
            <artifactId>springfox-swagger2</artifactId>
            <version>2.9.2</version>
        </dependency>
        <!-- https://mvnrepository.com/artifact/io.springfox/springfox-swagger-ui -->
        <dependency>
            <groupId>io.springfox</groupId>
            <artifactId>springfox-swagger-ui</artifactId>
            <version>2.9.2</version>
        </dependency>
|
3. 编写配置文件
编写Swagger2Config.java
 1
 2
 3
 4
 5
 6
 7
 8
 9
10
11
12
13
14
15
16
17
18
19
20
21
22
23
24
25
26
27
28
29
30
31
32
33
34
35
36
37
38
39
40
41
42
43
44
45
46
47
|
package com.example.Config;

import org.springframework.context.annotation.Bean;
import org.springframework.context.annotation.Configuration;
import springfox.documentation.builders.ApiInfoBuilder;
import springfox.documentation.builders.PathSelectors;
import springfox.documentation.builders.RequestHandlerSelectors;
import springfox.documentation.service.ApiInfo;
import springfox.documentation.service.Contact;
import springfox.documentation.spi.DocumentationType;
import springfox.documentation.spring.web.plugins.Docket;
import springfox.documentation.swagger2.annotations.EnableSwagger2;

/**
 * @author sgh
 * @date 2019/7/16 20:13
 */


@Configuration
@EnableSwagger2
public class Swagger2Config {

    @Bean
    public Docket createRestApi() {
        return new Docket(DocumentationType.SWAGGER_2)
                .apiInfo(apiInfo())
                .select()
                // swagger2要扫描的接口的包
                .apis(RequestHandlerSelectors.basePackage("com.example.controller"))
                .paths(PathSelectors.any())
                .build();
    }

    private ApiInfo apiInfo() {
        return new ApiInfoBuilder()
                // 页面标题
                .title("SpringBoot整合Swagger2")
                // 创建人信息
                .contact(new Contact("ShangguanHong", "https://shangguanhong.github.io/", "sgh1450280694@gmail.com"))
                // 描述
                .description("Spring Boot整合Swagger2测试")
                // 版本号
                .version("1.0")
                .build();
    }
}
|
- 该类需要放在启动类的包或者子包下,例如启动类包名为
com.example ,该类放在 com.example 或者 com.example.* 下都行
- @Configuration:表示这是一个配置类
- @EnableSwagger2:表示启用Swagger2功能
- 该配置类网上都大同小异,复制哪个都可以,只要别忘记修改 swagger2要扫描的接口的包 即可
4. 编写接口
UserController.java
 1
 2
 3
 4
 5
 6
 7
 8
 9
10
11
12
13
14
15
16
17
18
19
20
21
22
23
24
25
26
27
28
29
30
31
32
33
34
35
36
37
38
39
40
41
42
43
44
45
46
47
48
49
50
51
52
53
54
55
56
57
58
59
60
61
62
63
64
65
66
67
68
69
70
71
72
73
74
75
76
77
|
package com.example.controller;

import com.example.domain.User;
import com.example.mapper.UserMapper;
import io.swagger.annotations.Api;
import io.swagger.annotations.ApiImplicitParam;
import io.swagger.annotations.ApiImplicitParams;
import io.swagger.annotations.ApiOperation;
import org.springframework.beans.factory.annotation.Autowired;
import org.springframework.web.bind.annotation.*;

/**
 * @author sgh
 * @date 2019/7/16 20:52
 */
@RestController
@RequestMapping("/api/user")
@Api(value = "用户接口")
public class UserController {

    @Autowired
    private UserMapper userMapper;

    @ApiOperation(value = "获取用户", notes = "根据id查询用户信息")
    @ApiImplicitParam(name = "id", value = "用户id", required = true, dataType = "Int")
    @GetMapping(value = "/{id}")
    public User get(@PathVariable(name = "id") Integer id) {
        return userMapper.selectByPrimaryKey(id);
    }

    @ApiOperation(value = "更新用户", notes = "根据输入的用户信息更新用户")
    @ApiImplicitParams({
            @ApiImplicitParam(name = "id", value = "用户id", required = true, dataType = "Int"),
            @ApiImplicitParam(name = "user", value = "用户详细实体", required = true, dataType = "User")
    })
    @PutMapping(value = "/{id}")
    public String update(@PathVariable(name = "id") Integer id, @RequestBody User user) {
        String message;
        if (!id.equals(user.getId())) {
            message = "更新信息失败";
        } else {
            if (userMapper.updateByPrimaryKeySelective(user) == 1) {
                message = "更新信息成功";
            } else {
                message = "更新信息失败";
            }
        }
        return message;
    }

    @ApiOperation(value = "新增用户", notes = "根据输入的用户信息增加用户")
    @ApiImplicitParam(name = "user", value = "用户信息", required = true, dataType = "User")
    @PostMapping(value = "")
    public String insert(@RequestBody User user) {
        String message;
        if (userMapper.insertSelective(user) == 1) {
            message = "增加用户成功";
        } else {
            message = "增加用户失败";
        }
        return message;
    }

    @ApiOperation(value = "删除用户", notes = "根据id删除用户")
    @ApiImplicitParam(name = "id", value = "用户id", required = true, dataType = "Int")
    @PostMapping(value = "/{id}")
    public String delete(@PathVariable(name = "id") Integer id) {
        String message;
        if (userMapper.deleteByPrimaryKey(id) == 1) {
            message = "删除用户成功";
        } else {
            message = "删除用户失败";
        }
        return message;
    }

}
|
常用注解:
- **@Api()**用于类;
表示标识这个类是swagger的资源
- **@ApiOperation()**用于方法;
表示一个http请求的操作
- **@ApiParam()**用于方法,参数,字段说明;
表示对参数的添加元数据(说明或是否必填等)
- **@ApiModel()**用于类 ;
表示对类进行说明,用于参数用实体类接收
- **@ApiModelProperty()**用于方法,字段 ;
表示对model属性的说明或者数据操作更改
- **@ApiIgnore()**用于类,方法,方法参数 ;
表示这个方法或者类被忽略
- @ApiImplicitParam() 用于方法 ;
表示单独的请求参数
- @ApiImplicitParams() 用于方法,包含多个 @ApiImplicitParam
5. 测试
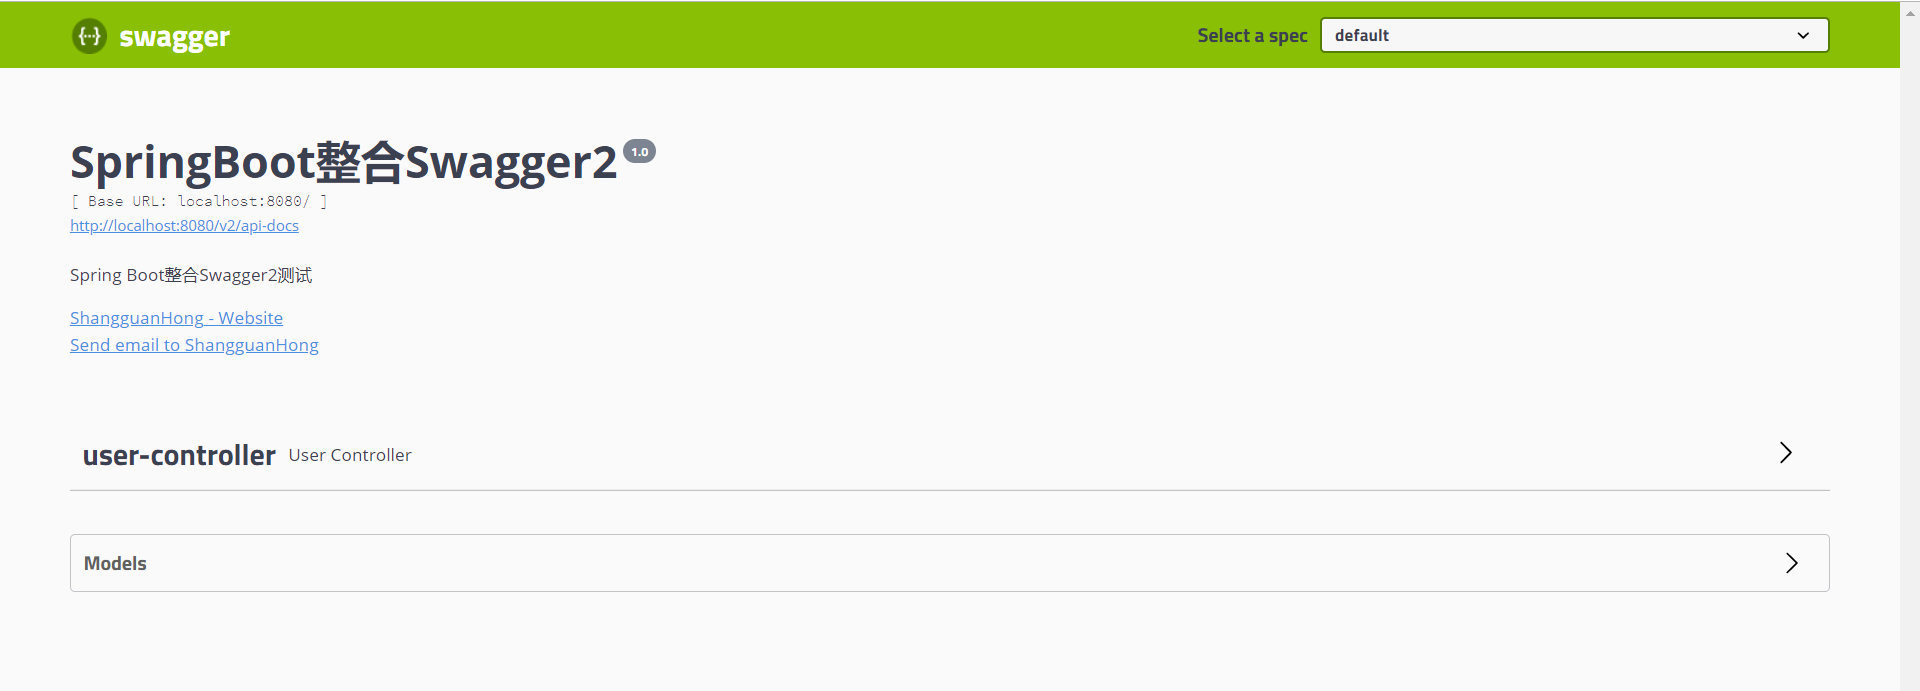
运行程序,在地址栏输入 localhost:8080/swagger-ui.html 就可以看到Swagger2自动帮我们生成的界面
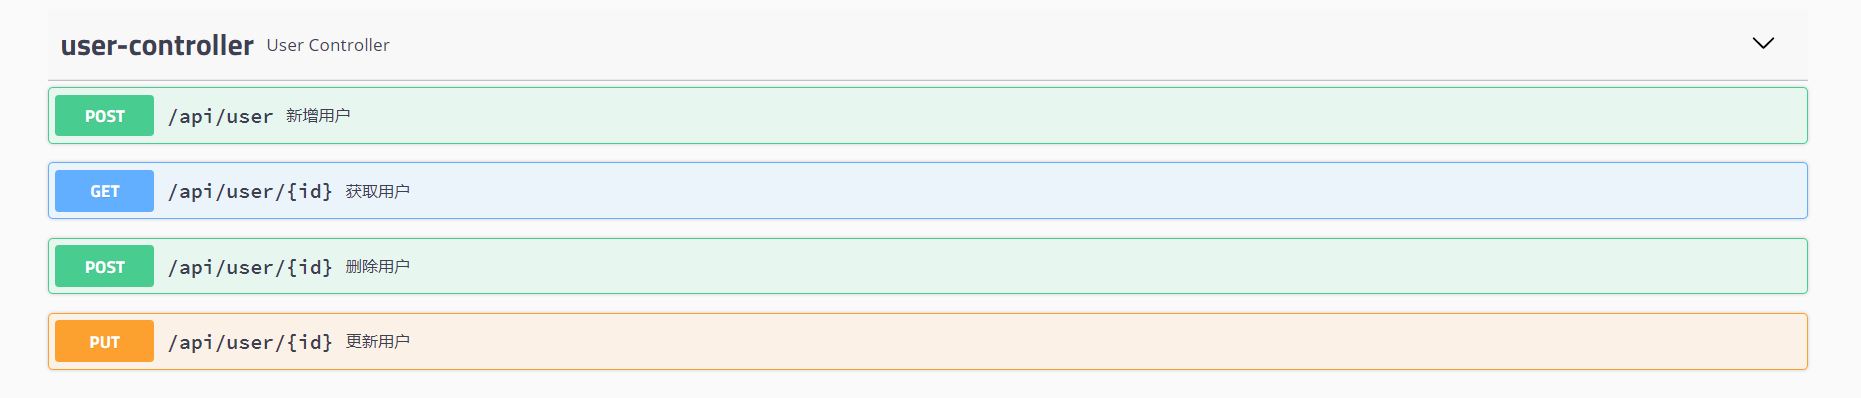
点击 user-controller ,可以看到我们编写的接口
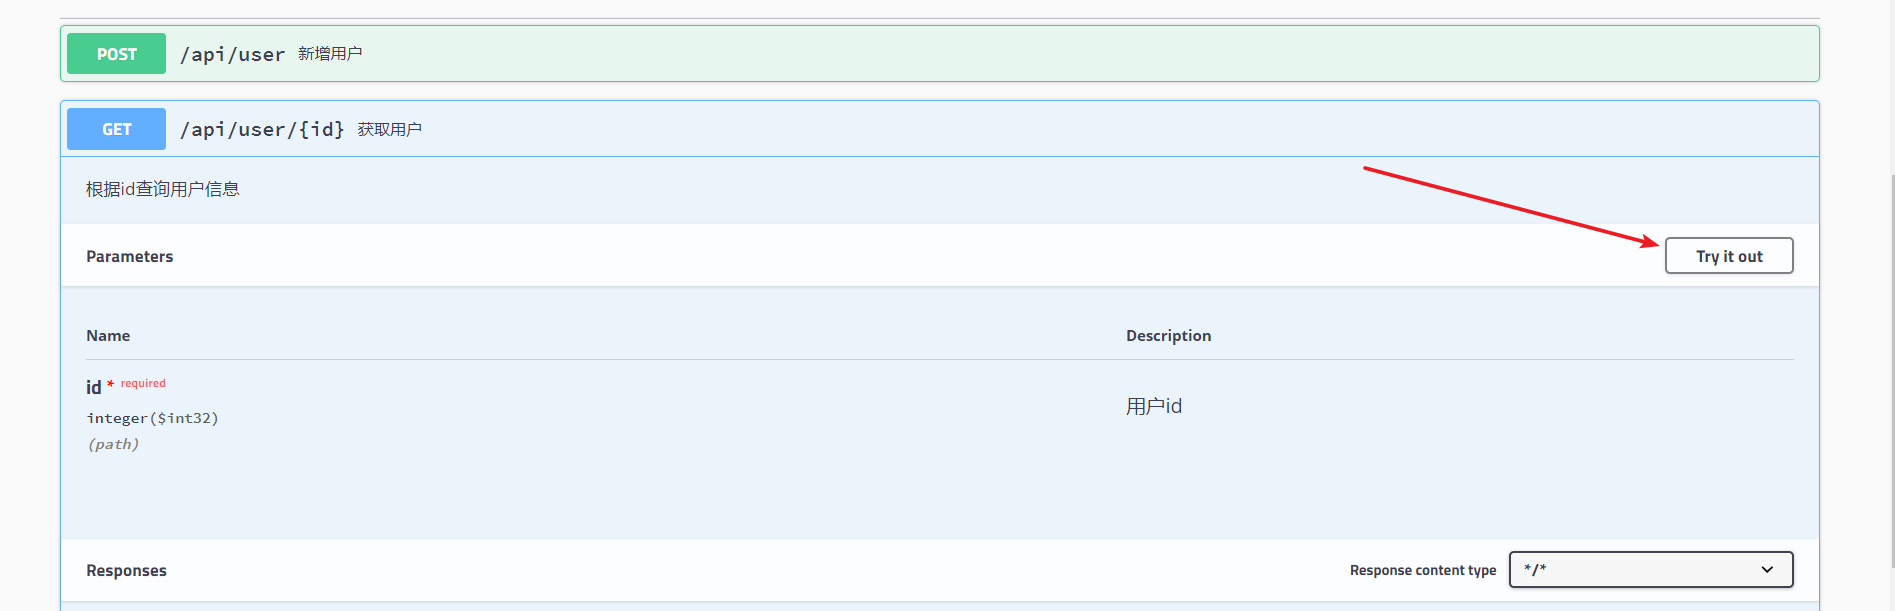
每一个接口都可以进行测试,这里我们试验 获取用户 接口,点击 try it out
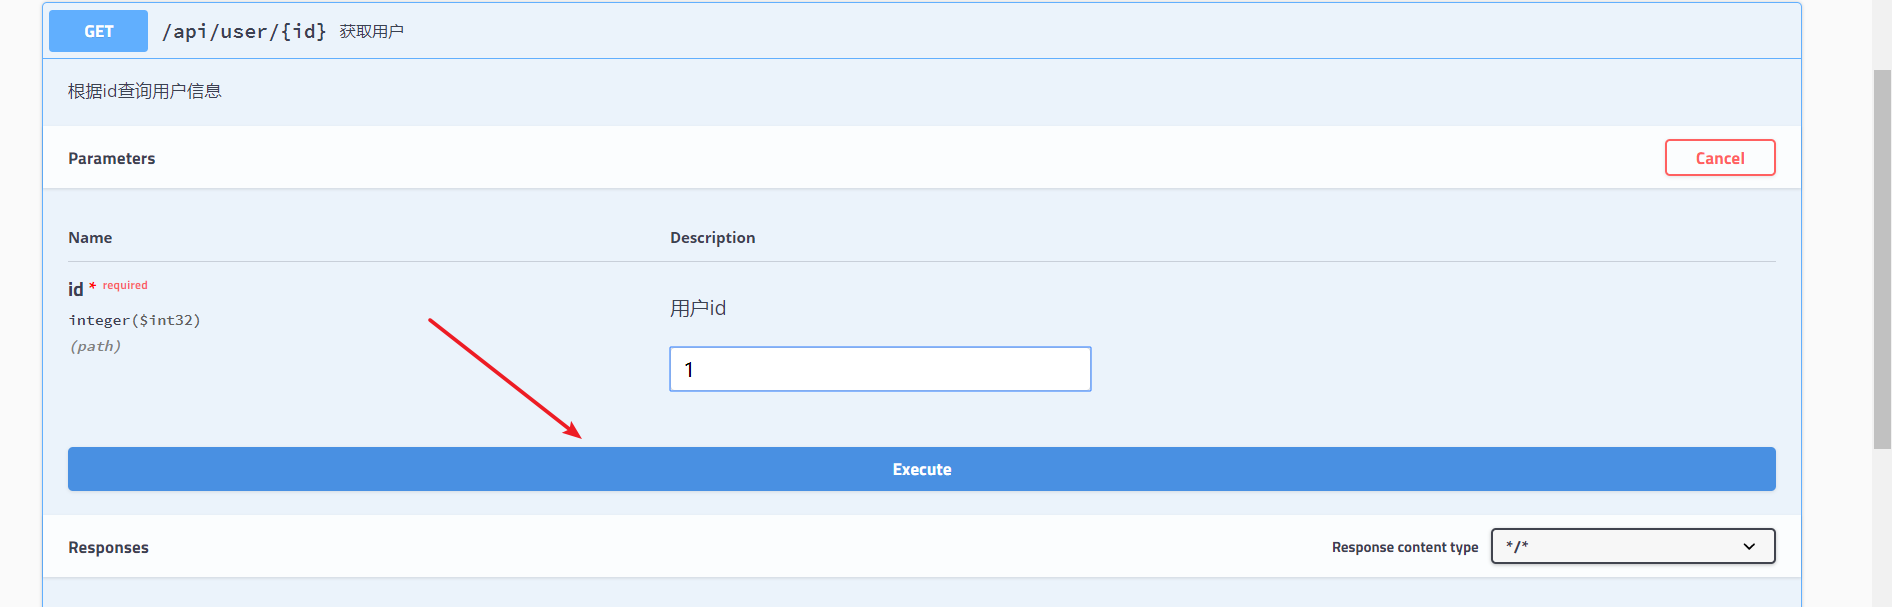
输入用户ID,然后执行
可以得到接口结果
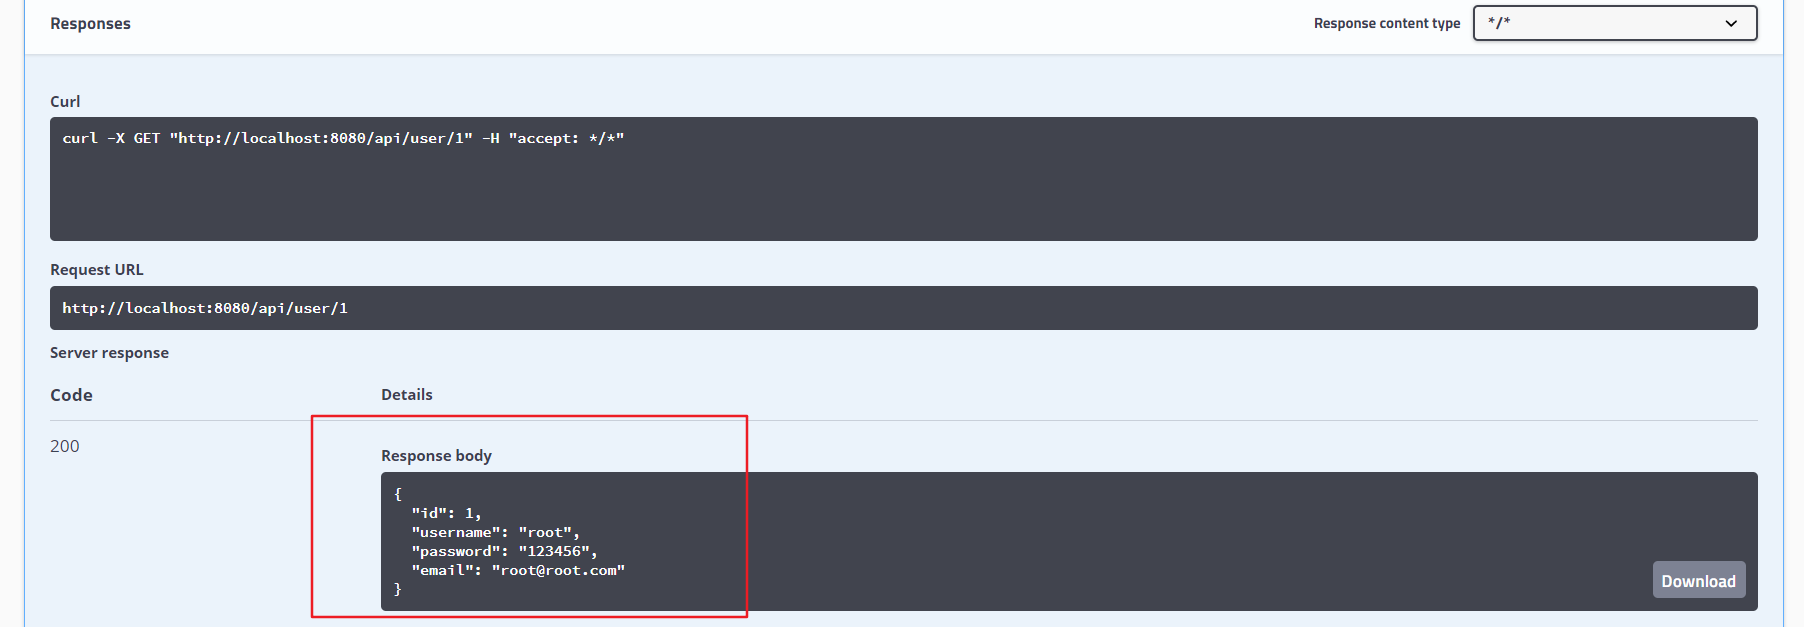
这是不是比手写接口文档方便多了,只需要修改接口的时候修改一下注解即可。
6. 参考资料
- Api接口文档生成工具:Swagger2
- Spring Boot中使用Swagger2构建强大的RESTful API文档