1. 前言
官网地址:http://mapstruct.org/
MapStruct 是一个代码生成器,简化了不同的 Java Bean 之间映射的处理,所谓的映射指的就是从一个实体变化成一个实体。例如我们在实际开发中,DAO 层的实体(PO)和一些数据传输对象(DTO),大部分属性都是相同的,只有少部分的不同,通过 mapStruct,可以让不同实体之间的转换变的简单。我们只需要按照约定的方式进行配置即可。
MapStruct 是一个可以处理注解的 Java 编译器插件,可以在命令行中使用,也可以在 IDE 中使用。MapStruct 有一些默认配置,但是也为用户提供了自己进行配置的途径。
下面进行 MapStruct 的使用。
2. 添加依赖
 1
 2
 3
 4
 5
 6
 7
 8
 9
10
|
       	<dependency>
            <groupId>org.mapstruct</groupId>
            <artifactId>mapstruct-jdk8</artifactId>
            <version>1.2.0.Final</version>
        </dependency>
        <dependency>
            <groupId>org.mapstruct</groupId>
            <artifactId>mapstruct-processor</artifactId>
            <version>1.2.0.Final</version>
        </dependency>
|
3. 创建模拟类
假设数据库中有 user 表(包含 id ,用户名,地址,角色这些字段)与 role 表(包含 id ,角色名,描述这些字段)。
假设前端查询 user 的时候只需要用到 userId 、 userName 、 userAddr 与 role 的 roleId 字段时,如果将整个 user 都输出到前端会多出许多没有用的属性。更通用的方式是需要用到的属性封装成一个类( DTO ),通过传输这个类的实例来完成数据传输。
User.java
1
2
3
4
5
6
7
|
@Data
public class User {
    private Long id;
    private String name;
    private String addr;
    private Role role;
}
|
Role.java
1
2
3
4
5
6
|
@Data
public class Role {
    private Long id;
    private String name;
    private String description;
}
|
UserRoleDto.java
1
2
3
4
5
6
7
|
@Data
public class UserRoleDto {
    private Long userId;
    private String userName;
    private String userAddr;
    private String roleName;
}
|
4. 编写映射类
新建一个 UserRoleMapper.java ,这个类用来定义 User.java 、 Role.java 和 UserRoleDto.java 之间属性对应规则。
 1
 2
 3
 4
 5
 6
 7
 8
 9
10
11
|
@Mapper(componentModel = "spring")
public interface UserMapper {

    @Mappings({
            @Mapping(source = "id", target = "userId"),
            @Mapping(source = "name", target = "userName"),
            @Mapping(source = "addr", target = "userAddr"),
            @Mapping(source = "role.name", target = "roleName"),
    })
    UserRoleDto toUserRoleDto(User user);
}
|
MapStruct中的注解
- @Mapper:注解在接口、类上,这样 MapStruct 才会去实现该接口
- componentModel:该属性用于指定实现类的类型,有几个属性:
- default:默认,不使用任何组建类型,可以通过Mappers.getMapper(Class) 方式获取实例对象
- spring:在实现类上注解 @Component,可通过 @Autowired 方式注入
- cdi: the generated mapper is an application-scoped CDI bean and can be retrieved via @Inject
- jsr330:实现类上添加@javax.inject.Named 和@Singleton注解,可以通过 @Inject注解获取。
- @Mappings:配置多个@Mapping
- @Mapping:配置属性映射,若源对象属性与目标对象名字一致,会自动映射对应属性
- source:源属性、target:目标属性
- dateFormat:可将 String 到 Date 日期之间相互转换,通过 SimpleDateFormat,该值为 SimpleDateFormat 的日期格式
写完该映射类后,当启动 IDE 的时候 IDE 会帮我们编译, 会自动在 target/classes 下生成对应的实现类,可以查看其实现的方法。
 1
 2
 3
 4
 5
 6
 7
 8
 9
10
11
12
13
14
15
16
17
18
19
20
21
22
23
24
25
26
27
28
29
30
31
32
33
34
35
36
37
38
39
40
41
42
43
|
// 该类为自动生成的
@Generated(
    value = "org.mapstruct.ap.MappingProcessor",
    date = "2019-07-17T21:00:35+0800",
    comments = "version: 1.2.0.Final, compiler: javac, environment: Java 1.8.0_191 (Oracle Corporation)"
)
@Component
public class UserMapperImpl implements UserMapper {

    @Override
    public UserRoleDto toUserRoleDto(User user) {
        if ( user == null ) {
            return null;
        }

        UserRoleDto userRoleDto = new UserRoleDto();

        String name = userRoleName( user );
        if ( name != null ) {
            userRoleDto.setRoleName( name );
        }
        userRoleDto.setUserAddr( user.getAddr() );
        userRoleDto.setUserName( user.getName() );
        userRoleDto.setUserId( user.getId() );

        return userRoleDto;
    }

    private String userRoleName(User user) {
        if ( user == null ) {
            return null;
        }
        Role role = user.getRole();
        if ( role == null ) {
            return null;
        }
        String name = role.getName();
        if ( name == null ) {
            return null;
        }
        return name;
    }
}
|
5. 测试
 1
 2
 3
 4
 5
 6
 7
 8
 9
10
11
12
13
14
15
16
17
18
19
20
21
22
23
24
25
26
27
28
|
@RunWith(SpringRunner.class)
@SpringBootTest
public class SpringbootMapstructApplicationTests {

    @Autowired
    UserMapper userMapper;

    User user;

    Role role;

    @Before
    public void before() {
        // 模拟数据库数据
        role = new Role(2L, "admin", "管理员哦");
        user = new User(1L, "sgh", "China", role);
    }

    @Test
    public void contextLoads() {
        System.out.println("----------------user---------------");
        System.out.println(user);
        UserRoleDto userRoleDto = userMapper.toUserRoleDto(user);
        System.out.println("----------------touserDto--------------");
        System.out.println(userRoleDto);
    }

}
|
运行结果
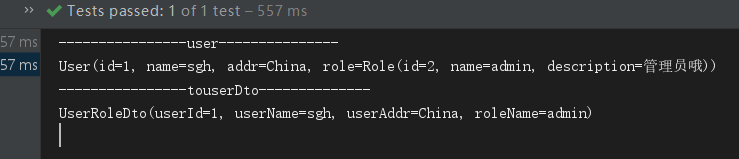
可以看到 user.role.name 字段成功映射到了 userRoleDto 的 roleName 字段上。
6. 使用实现类的实例进行转换
UserRoleMapper.java 类修改如下
 1
 2
 3
 4
 5
 6
 7
 8
 9
10
11
12
13
14
|
@Mapper
public interface UserRoleMapper {

    // 获取该类自动生成的实现类的实例
    UserRoleMapper INSTANCE = Mappers.getMapper(UserRoleMapper.class);

    @Mappings({
            @Mapping(source = "id", target = "userId"),
            @Mapping(source = "name", target = "userName"),
            @Mapping(source = "addr", target = "userAddr"),
            @Mapping(source = "role.name", target = "roleName"),
    })
    UserRoleDto toUserRoleDto(User user);
}
|
Mapper 的 componentModel 属性使用默认的 default (不写即为 default)
测试类修改为
 1
 2
 3
 4
 5
 6
 7
 8
 9
10
11
12
13
14
15
16
17
18
19
20
21
22
23
24
25
|
@RunWith(SpringRunner.class)
@SpringBootTest
public class SpringbootMapstructApplicationTests {
    User user;

    Role role;

    @Before
    public void before() {
        // 模拟数据库数据
        role = new Role(2L, "admin", "管理员哦");
        user = new User(1L, "sgh", "China", role);
    }

    @Test
    public void contextLoads() {
        System.out.println("----------------user---------------");
        System.out.println(user);
        UserRoleMapper INSTANCE = UserRoleMapper.INSTANCE;
        UserRoleDto userRoleDto = INSTANCE.toUserRoleDto(user);
        System.out.println("----------------touserDto--------------");
        System.out.println(userRoleDto);
    }

}
|
注意区别,因为映射类的 componentModel 不使用 spring , 因此不能通过 @Autowired 来自动注入,需要使用该类的实例来进行转换。
具体体现在以下两行代码中
UserRoleMapper INSTANCE = UserRoleMapper.INSTANCE;
UserRoleDto userRoleDto = INSTANCE.toUserRoleDto(user);
7. 多个参数
可以绑定多个对象的属性值到目标对象中
 1
 2
 3
 4
 5
 6
 7
 8
 9
10
11
12
13
14
15
16
17
18
19
20
21
|
@Mapper(componentModel = "spring")
public interface UserRoleMapper {

    // 使用单一对象
    @Mappings({
            @Mapping(source = "id", target = "userId"),
            @Mapping(source = "name", target = "userName"),
            @Mapping(source = "addr", target = "userAddr"),
            @Mapping(source = "role.name", target = "roleName"),
    })
    UserRoleDto toUserRoleDto(User user);

    // 使用两个对象
    @Mappings({
            @Mapping(source = "user.id", target = "userId"),
            @Mapping(source = "user.name", target = "userName"),
            @Mapping(source = "user.addr", target = "userAddr"),
            @Mapping(source = "role.name", target = "roleName"),
    })
    UserRoleDto toUserRoleDto(User user, Role role);
}
|
测试类修改为
 1
 2
 3
 4
 5
 6
 7
 8
 9
10
11
12
13
14
15
16
17
18
19
20
21
22
23
24
25
26
27
28
|
@RunWith(SpringRunner.class)
@SpringBootTest
public class SpringbootMapstructApplicationTests {

    @Autowired
    UserRoleMapper userRoleMapper;

    User user;

    Role role;

    @Before
    public void before() {
        // 模拟数据库数据
        role = new Role(2L, "admin", "管理员哦");
        user = new User(1L, "sgh", "China", role);
    }

    @Test
    public void contextLoads() {
        System.out.println("----------------user---------------");
        System.out.println(user);
        UserRoleDto userRoleDto = userRoleMapper.toUserRoleDto(user, role);
        System.out.println("----------------touserDto--------------");
        System.out.println(userRoleDto);
    }

}
|
这里使用传两个参数进行属性映射,结果一致
项目代码: https://github.com/ShangguanHong/SpringBootDemo/tree/master/springboot-mapstruct
8. 参考资料
- MapStruct超级简单的学习笔记