1. 前言
之前介绍了一下 JWT ,在最后提到了
JWT 本身没啥难度,但安全整体是一个比较复杂的事情,JWT 只不过提供了一种基于 token 的请求验证机制。但我们的用户权限,对于 API 的权限划分、资源的权限划分,用户的验证等等都不是 JWT 负责的。也就是说,请求验证后,你是否有权限看对应的内容是由你的用户角色决定的。所以我们这里要利用 Spring 的一个子项目 Spring Security 来简化我们的工作。
本文就介绍一下如何利用 Spring Security 来配合 JWT 来使用。
2. Spring Security的介绍
Spring Security 是一个基于 Spring 的通用安全框架,里面内容太多了,本文的主要目的也不是展开讲这个框架,而是如何利用 Spring Security 和 JWT 一起来完成 API 保护。所以关于 Spring Secruity 的基础内容或展开内容,请自行去 官网 学习。
3. 使用Spring Security
3.1 表结构
首先使用 Spring Security 的系统需要有用户与角色的概念,一个用户可以拥有多个角色,一个角色可以分配给多个用户,因此用户和角色之间是多对多的关系,利用一个中间表来维护它们之间的关系。
sys_user:
| id |
username |
password |
lastPasswordResetDate |
enabled |
| 1 |
admin |
admin |
null |
1 |
| 2 |
user |
user |
null |
1 |
sys_role:
| id |
role_name |
| 1 |
ADMIN |
| 2 |
USER |
sys_user_role:
管理员拥有用户和管理员两种角色,而用户仅仅拥有用户的角色
jpa 表示如下:
User:
 1
 2
 3
 4
 5
 6
 7
 8
 9
10
11
12
13
14
15
16
17
18
19
20
21
22
23
24
25
26
27
28
29
30
|
@Entity
@Data
@Table(name = "sys_user")
@EqualsAndHashCode(exclude = {"roles"})
public class User {

    @Id
    @GeneratedValue(strategy = GenerationType.IDENTITY)
    @Column(name = "id")
    private Long id;

    @Column(name = "username")
    private String username;

    @Column(name = "password")
    private String password;

    @Column(name = "enabled")
    private boolean enabled;

    @Column(name = "last_password_reset_date")
    @Temporal(TemporalType.TIMESTAMP)
    private Date lastPasswordResetDate;

    @ManyToMany(cascade = {CascadeType.ALL}, fetch = FetchType.EAGER)
    @JoinTable(name = "sys_user_role",
            joinColumns = {@JoinColumn(name = "u_id", referencedColumnName = "id")},
            inverseJoinColumns = {@JoinColumn(name = "r_id", referencedColumnName = "id")})
    private Set<Role> roles = new HashSet<>();
}
|
3.2 application.yml配置文件与pom.xml
application.yml
1
2
3
4
5
6
7
|
# 接下来需要注入到spring内的自定义数据如下
jwt:
  secret: sgh_secret
  expiration: 7200
  header: Authorization
  authentication:
    path: /auth
|
导入坐标
 1
 2
 3
 4
 5
 6
 7
 8
 9
10
11
|
<!-- Spring Security-->
<dependency>
    <groupId>org.springframework.boot</groupId>
    <artifactId>spring-boot-starter-security</artifactId>
</dependency>
<!--jwt-->
<dependency>
	<groupId>io.jsonwebtoken</groupId>
	<artifactId>jjwt</artifactId>
	<version>0.9.1</version>
</dependency>
|
3.4 实现Spring Security接口
Spring Security 需要我们实现几个东西,第一个是 UserDetails ,这个接口中规定了用户的几个必须要有的方法。所以我们创建一个 JwtUser 类来实现这个接口。
 1
 2
 3
 4
 5
 6
 7
 8
 9
10
11
12
13
14
15
16
17
18
19
20
21
22
23
24
25
26
27
28
29
30
31
32
33
34
35
36
37
38
39
40
41
42
43
44
45
46
47
48
49
50
51
52
|
@Data
@AllArgsConstructor
public class JwtUser implements UserDetails {
    private final Long id;
    private final String username;
    private final String password;
    /**
     * 用户的角色列表
     */
    private final Collection<? extends GrantedAuthority> authorities;
    /**
     * 用户是否激活
     */
    private final boolean enabled;
    /**
     * 最后修改密码的日期
     */
    private final Date lastPasswordResetDate;

    /**
     * 账户是否未过期
     *
     * @return true
     */
    @JsonIgnore
    @Override
    public boolean isAccountNonExpired() {
        return true;
    }

    /**
     * 账号是否未锁定
     *
     * @return true
     */
    @JsonIgnore
    @Override
    public boolean isAccountNonLocked() {
        return true;
    }

    /**
     * 密码是否未过期
     *
     * @return true
     */
    @JsonIgnore
    @Override
    public boolean isCredentialsNonExpired() {
        return true;
    }
}
|
创建一个 JwtUserFactory 来处理由 User 转化为 JwtUser
 1
 2
 3
 4
 5
 6
 7
 8
 9
10
11
12
13
14
15
16
17
18
|
public class JwtUserFactory {
    public static JwtUser create(User user) {
        return new JwtUser(
                user.getId(),
                user.getUsername(),
                user.getPassword(),
                mapToGrantedAuthorities(user.getRoles()),
                user.isEnabled(),
                user.getLastPasswordResetDate()
        );
    }

    private static List<GrantedAuthority> mapToGrantedAuthorities(Set<Role> roles) {
        return roles.stream()
                .map(role -> new SimpleGrantedAuthority(role.getRoleName()))
                .collect(Collectors.toList());
    }
}
|
第二个要实现的是 UserDetailsService,这个接口只定义了一个方法 loadUserByUsername,顾名思义,就是提供一种从用户名可以查到用户并返回的方法。注意,不一定是数据库哦,文本文件、xml文件等等都可能成为数据源,这也是为什么Spring提供这样一个接口的原因:保证你可以采用灵活的数据源。接下来我们建立一个 JwtUserDetailsServiceImpl 来实现这个接口。
 1
 2
 3
 4
 5
 6
 7
 8
 9
10
11
12
13
14
15
16
|
@Service
public class JwtUserDetailsServiceImpl implements UserDetailsService {

    @Resource
    private UserRepository userRepository;

    @Override
    public UserDetails loadUserByUsername(String username) throws UsernameNotFoundException {
        User user = userRepository.findByUserName(username);
        if (user == null) {
            throw new UsernameNotFoundException(String.format("No user found with username '%s'.", username));
        } else {
            return JwtUserFactory.create(user);
        }
    }
}
|
为了让 Spring 可以知道我们想怎样控制安全性,我们还需要建立一个安全配置类 WebSecurityConfig 继承自 WebSecurityConfigurerAdapter
 1
 2
 3
 4
 5
 6
 7
 8
 9
10
11
12
13
14
15
16
17
18
19
20
21
22
23
24
25
26
27
28
29
30
31
32
33
34
35
36
37
38
39
40
41
42
43
44
45
46
47
48
49
50
51
52
53
54
55
56
57
58
59
60
61
62
63
64
65
66
67
68
69
70
71
72
73
74
75
76
77
78
79
80
81
|
@Configuration
@EnableWebSecurity
@EnableGlobalMethodSecurity(prePostEnabled = true)
public class WebSecurityConfig extends WebSecurityConfigurerAdapter {
    /**
     * Spring会自动寻找同样类型的具体类注入,这里就是JwtUserDetailsServiceImpl了
     */
    @Resource
    private UserDetailsService userDetailsService;

    @Autowired
    public void configureAuthentication(AuthenticationManagerBuilder auth) throws Exception {
        auth
                // 设置UserDetailsService
                .userDetailsService(userDetailsService)
                // 使用BCrypt进行密码的hash
                .passwordEncoder(passwordEncoder());
    }

    /**
     * 装载BCrypt密码编码器
     */
    @Bean
    public PasswordEncoder passwordEncoder() {
        return new BCryptPasswordEncoder();
    }

    @Bean
    GrantedAuthorityDefaults grantedAuthorityDefaults() {
        // Remove the ROLE_ prefix
        return new GrantedAuthorityDefaults("");
    }

    @Override
    protected void configure(HttpSecurity httpSecurity) throws Exception {
        httpSecurity
                // 由于使用的是JWT,我们这里不需要csrf
                .csrf().disable()
                // 基于token,所以不需要session
                .sessionManagement().sessionCreationPolicy(SessionCreationPolicy.STATELESS).and()
                .authorizeRequests()
                //.antMatchers(HttpMethod.OPTIONS, "/**").permitAll()
                // 允许对于网站静态资源的无授权访问
                .antMatchers(
                        HttpMethod.GET,
                        "/",
                        "/*.html",
                        "/favicon.ico",
                        "/**/*.html",
                        "/**/*.css",
                        "/**/*.js"
                ).permitAll()
                // 对于获取token的rest api要允许匿名访问
                .antMatchers("/auth/**").permitAll()
                // 除上面外的所有请求全部需要鉴权认证
                .anyRequest().authenticated();
        // 禁用缓存
        httpSecurity.headers().cacheControl();
    }

    @Override
    public void configure(WebSecurity web) throws Exception {
        // 过滤器会忽略下面的路径
        web
                .ignoring()
                .antMatchers(
                        HttpMethod.POST,
                        "/auth/**"
                ).and()
                .ignoring()
                .antMatchers(
                        HttpMethod.GET,
                        "/",
                        "/*.html",
                        "/favicon.ico",
                        "/**/*.html",
                        "/**/*.css",
                        "/**/*.js"
                );
    }
}
|
至此,对 Spring Security 的前期准备算是完成了,接下来进行 JWT 与 Spring Security 的整合。
4. JWT整合Spring Security
4.1 JwtTokenUtil
先写一个 JwtTokenUtil 工具类,来处理 JWT 的常见问题,可以直接使用,只需自己修改下 secret 和 expiration 即可
 1
 2
 3
 4
 5
 6
 7
 8
 9
10
11
12
13
14
15
16
17
18
19
20
21
22
23
24
25
26
27
28
29
30
31
32
33
34
35
36
37
38
39
40
41
42
43
44
45
46
47
48
49
50
51
52
53
54
55
56
57
58
59
60
61
62
63
64
65
66
67
68
69
70
71
72
73
74
75
76
77
78
79
80
81
82
83
84
85
86
87
88
89
90
91
92
93
94
|
@Component
public class JwtTokenUtil implements Serializable {
    private static final long serialVersionUID = 1L;

    @Value("${jwt.secret}")
    private String secret;

    @Value("${jwt.expiration}")
    private Long expiration;

    public String generateToken(UserDetails userDetails) {
        Map<String, Object> claims = new HashMap<>(10);
        return doGenerateToken(claims, userDetails.getUsername());
    }

    public boolean validateToken(String token, UserDetails userDetails) {
        JwtUser user = (JwtUser) userDetails;
        final String username = getUsernameFromToken(token);
        final Date created = getIssuedAtDateFromToken(token);
        return (
                username.equals(user.getUsername())
                        && !isTokenExpired(token)
                        && !isCreatedBeforeLastPasswordReset(created, user.getLastPasswordResetDate())
        );
    }

    private Boolean isTokenExpired(String token) {
        final Date expiration = getExpirationDateFromToken(token);
        return expiration.before(new Date());
    }

    private Boolean isCreatedBeforeLastPasswordReset(Date created, Date lastPasswordReset) {
        return (lastPasswordReset != null && created.before(lastPasswordReset));
    }

    private String doGenerateToken(Map<String, Object> claims, String subject) {
        final Date createdDate = new Date();
        final Date expirationDate = new Date(createdDate.getTime() + expiration * 1000);
        return Jwts.builder()
                .setClaims(claims)
                .setSubject(subject)
                .setIssuedAt(createdDate)
                .setExpiration(expirationDate)
                .signWith(SignatureAlgorithm.HS512, secret)
                .compact();
    }

    private <T> T getClaimFromToken(String token, Function<Claims, T> claimsResolver) {
        final Claims claims = getAllClaimsFromToken(token);
        return claimsResolver.apply(claims);
    }

    private Claims getAllClaimsFromToken(String token) {
        return Jwts.parser()
                .setSigningKey(secret)
                .parseClaimsJws(token)
                .getBody();
    }

    private String getUsernameFromToken(String token) {
        return getClaimFromToken(token, Claims::getSubject);
    }

    private Date getIssuedAtDateFromToken(String token) {
        return getClaimFromToken(token, Claims::getIssuedAt);
    }

    private Date getExpirationDateFromToken(String token) {
        return getClaimFromToken(token, Claims::getExpiration);
    }

    private Boolean ignoreTokenExpiration(String token) {
        // here you specify tokens, for that the expiration is ignored
        return false;
    }

    public Boolean canTokenBeRefreshed(String token, Date lastPasswordReset) {
        final Date created = getIssuedAtDateFromToken(token);
        return !isCreatedBeforeLastPasswordReset(created, lastPasswordReset)
                && (!isTokenExpired(token) || ignoreTokenExpiration(token));
    }

    public String refreshToken(String token) {
        final Date createdDate = new Date();
        final Date expirationDate = new Date(createdDate.getTime() + expiration * 1000);
        final Claims claims = getAllClaimsFromToken(token);
        claims.setIssuedAt(createdDate);
        claims.setExpiration(expirationDate);
        return Jwts.builder()
                .setClaims(claims)
                .signWith(SignatureAlgorithm.HS512, secret)
                .compact();
    }
}
|
4.2 JwtAuthorizationTokenFilter
要想要 JWT 在 Spring 中工作,需要新建一个 JwtAuthorizationTokenFilter ,并把它配置在 WebSecurityConfig 中。
 1
 2
 3
 4
 5
 6
 7
 8
 9
10
11
12
13
14
15
16
17
18
19
20
21
22
23
24
25
26
27
28
29
30
31
32
33
34
35
36
37
38
39
40
41
42
43
44
45
46
47
48
49
50
51
52
53
54
55
56
57
58
|
@Component
@Slf4j
public class JwtAuthorizationTokenFilter extends OncePerRequestFilter {
    private static final String HEADER = "Bearer ";

    @Resource
    private UserDetailsService userDetailsService;

    @Resource
    private JwtTokenUtil jwtTokenUtil;

    @Value("${jwt.header}")
    private String tokenHeader;

    @Override
    protected void doFilterInternal(HttpServletRequest request, HttpServletResponse response, FilterChain chain) throws ServletException, IOException {
        log.debug("processing authentication for '{}'", request.getRequestURL());
        final String requestHeader = request.getHeader(this.tokenHeader);
        String username = null;
        String authToken = null;
        if (requestHeader != null && requestHeader.startsWith(HEADER)) {
            authToken = requestHeader.substring(HEADER.length());
            try {
                username = jwtTokenUtil.getUsernameFromToken(authToken);
            } catch (IllegalArgumentException e) {
                log.error("the token is expired and not valid anymore", e);
            } catch (ExpiredJwtException e) {
                log.warn("the token is expired and not valid anymore", e);
            }
        } else {
            log.warn("couldn't find bearer string, will ignore the header");
        }
        log.debug("checking authentication for user '{}'", username);
        if (username != null && SecurityContextHolder.getContext().getAuthentication() == null) {
            log.debug("security context was null, so authorizing user");

            // It is not compelling necessary to load the use details from the database. You could also store the information
            // in the token and read it from it. It's up to you ;)
            UserDetails userDetails;
            try {
                userDetails = userDetailsService.loadUserByUsername(username);
            } catch (UsernameNotFoundException e) {
                response.sendError(HttpServletResponse.SC_UNAUTHORIZED, e.getMessage());
                return;
            }

            // For simple validation it is completely sufficient to just check the token integrity. You don't have to call
            // the database compellingly. Again it's up to you ;)
            if (jwtTokenUtil.validateToken(authToken, userDetails)) {
                UsernamePasswordAuthenticationToken authentication = new UsernamePasswordAuthenticationToken(userDetails, null, userDetails.getAuthorities());
                authentication.setDetails(new WebAuthenticationDetailsSource().buildDetails(request));
                log.info("authorized user '{}', setting security context", username);
                SecurityContextHolder.getContext().setAuthentication(authentication);
            }
        }
        chain.doFilter(request, response);
    }
}
|
如果我们足够相信 token 中的数据,也就是我们足够相信签名 token 的 secret 的机制足够好,这种情况下,我们可以不用再查询数据库,而直接采用 token 中的数据。本例中,我们还是通过 Spring Security 的 @UserDetailsService 进行了数据查询,但简单验证的话,你可以采用直接验证 token 是否合法来避免昂贵的数据查询。
4.3 WebSecurityConfig
接下来,在 WebSecurityConfig 中注入这个 filter,并且配置到 HttpSecurity中,这里的 WebSecurityConfig 忽略所有之前的配置
 1
 2
 3
 4
 5
 6
 7
 8
 9
10
11
12
|
public class WebSecurityConfig extends WebSecurityConfigurerAdapter {
    @Bean
    public JwtAuthorizationTokenFilter jwtAuthorizationTokenFilterBean() throws Exception {
        return new JwtAuthorizationTokenFilter();
    }

    @Override
    protected void configure(HttpSecurity httpSecurity) throws Exception {
        httpSecurity
                .addFilterBefore(jwtAuthorizationTokenFilterBean(), UsernamePasswordAuthenticationFilter.class);
    }
}
|
至此,除了登录的所有的接口都在 Spring Security 的保护下,下面进行我们的测试
5. 测试
之前在编写 WebSecurityConfig 配置文件的时候,预留了一个路径作为用户登录来使用,代码段如下
1
2
|
// 对于获取token的rest api要允许匿名访问
.antMatchers("/auth/**").permitAll()
|
这段代码指定了在路径 /auth 下的资源可以不用认证就能被访问,登录接口理所应该放在该路径下
新建一个 AuthController 来完成用户登录认证操作
 1
 2
 3
 4
 5
 6
 7
 8
 9
10
11
12
13
14
15
16
17
18
19
20
21
22
|
@RequestMapping(value = "auth")
@RestController
public class AuthController {

    @Resource
    private JwtTokenUtil jwtTokenUtil;

    @Resource
    private UserDetailsService userDetailsService;

    @RequestMapping(value = "${jwt.authentication.path}", method = RequestMethod.POST)
    public ResponseEntity<String> createAuthenticationToken(@RequestBody JwtAuthenticationRequest authenticationRequest) throws AuthenticationException {
        final UserDetails userDetails = userDetailsService.loadUserByUsername(authenticationRequest.getUsername());
        if (!userDetails.getPassword().equals(authenticationRequest.getPassword())) {
            return ResponseEntity.status(HttpStatus.UNAUTHORIZED).body("Bad credentials");
        }
        // Reload password post-security so we can generate the token
        final String token = jwtTokenUtil.generateToken(userDetails);
        // Return the token
        return ResponseEntity.ok(token);
    }
}
|
我们利用 PostMan 软件来测试

登录接口测试完毕之后,接下来我们要规定一下哪些资源需要什么样的角色可以访问了。
编写一个 TestController 来测试
 1
 2
 3
 4
 5
 6
 7
 8
 9
10
11
12
13
14
15
16
|
@RestController
@RequestMapping("api")
public class TestController {

    @PreAuthorize("hasAnyRole('ADMIN')")
    @GetMapping("/admin")
    public String adminTest() {
        return "管理员可以访问";
    }

    @PreAuthorize("hasAnyRole('USER', 'ADMIN')")
    @GetMapping("/user")
    public String userTest() {
        return "普通用户可以访问";
    }
}
|
@PreAuthorize("hasAnyRole('ADMIN')") 表示这个资源只能被拥有 ADMIN 角色的用户访问
@PreAuthorize("hasAnyRole('USER', 'ADMIN')") 表示这个资源可以被拥有 ADMIN 与 USER 角色的用户访问
现在访问这些接口时,就需要在请求上加上 Authorization , 其值为 “Bearer " + token (注意Bearer后有一个空格)
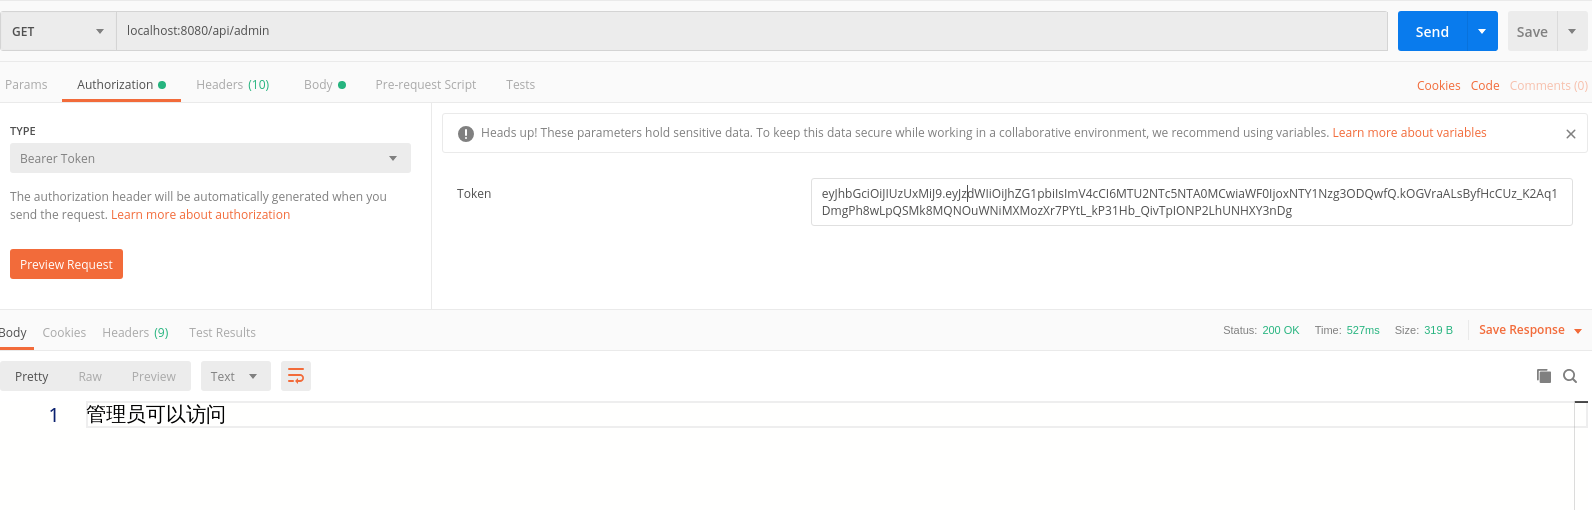
访问 localhost:8080/api/admin
访问 localhost:8080/api/user
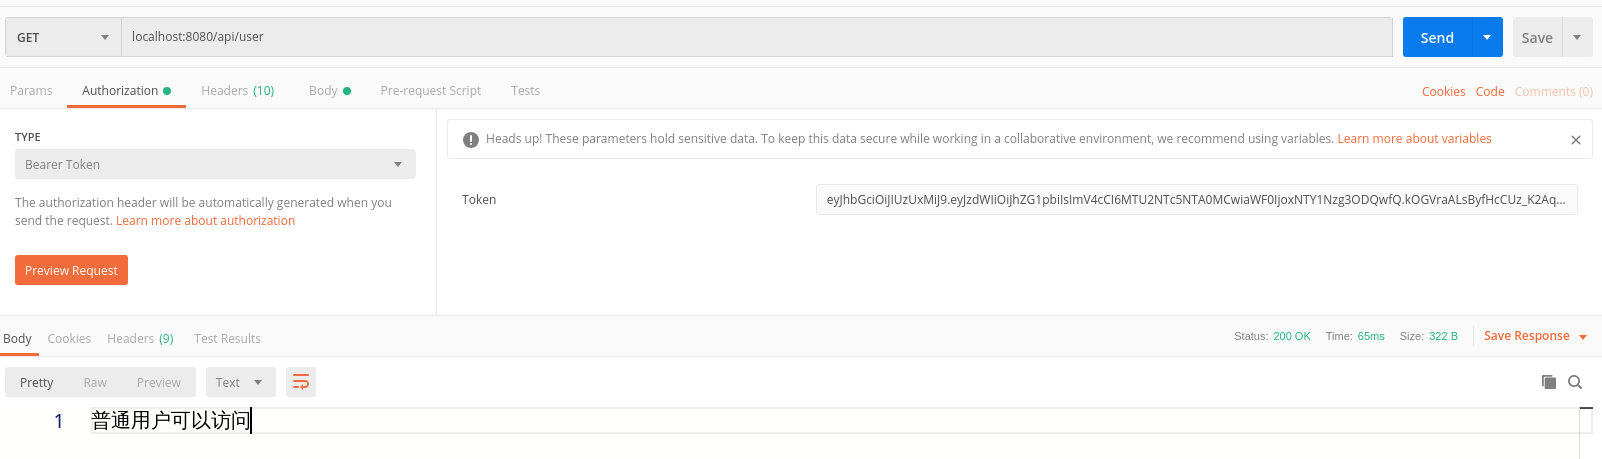
可以看到拥有 ADMIN 权限的可以访问这两个接口
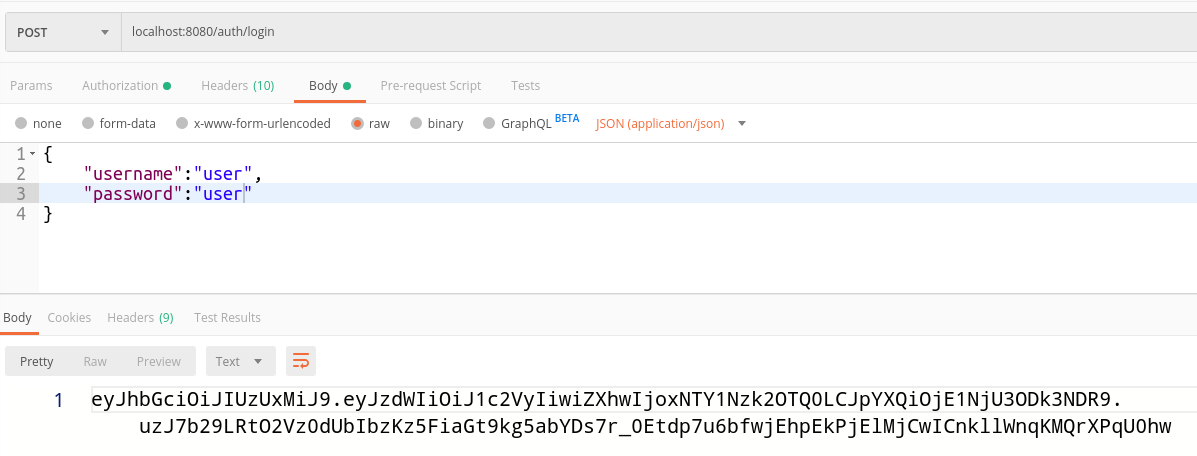
现在来测试普通用户
首先获取普通用户的 token
访问 localhost:8080/api/user
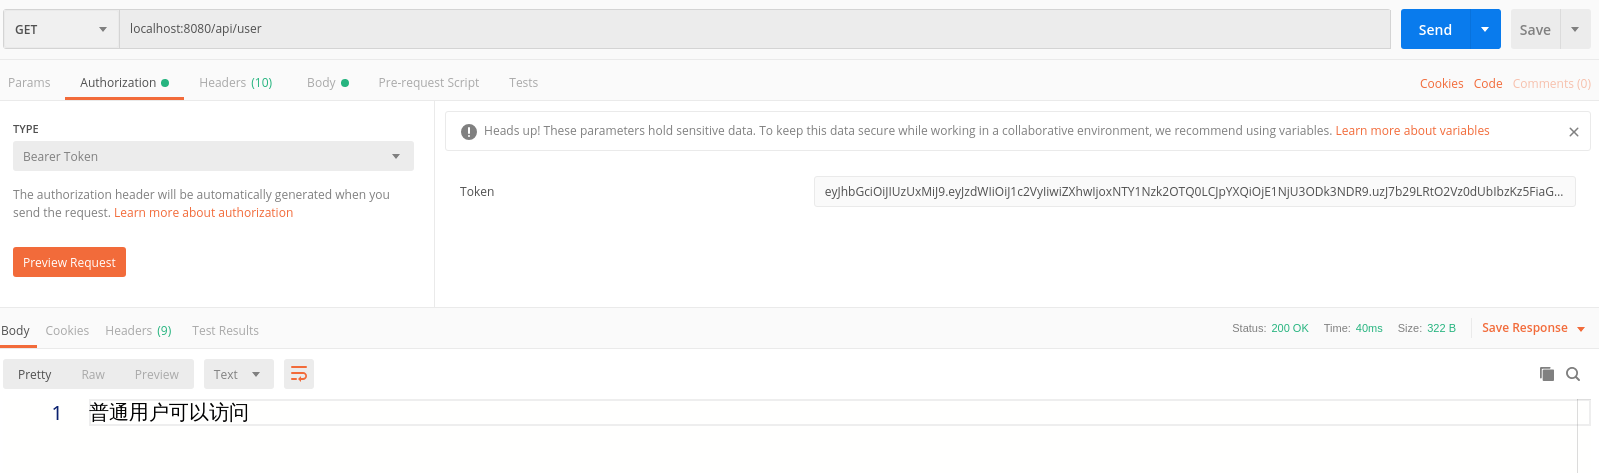
访问 localhost:8080/api/admin
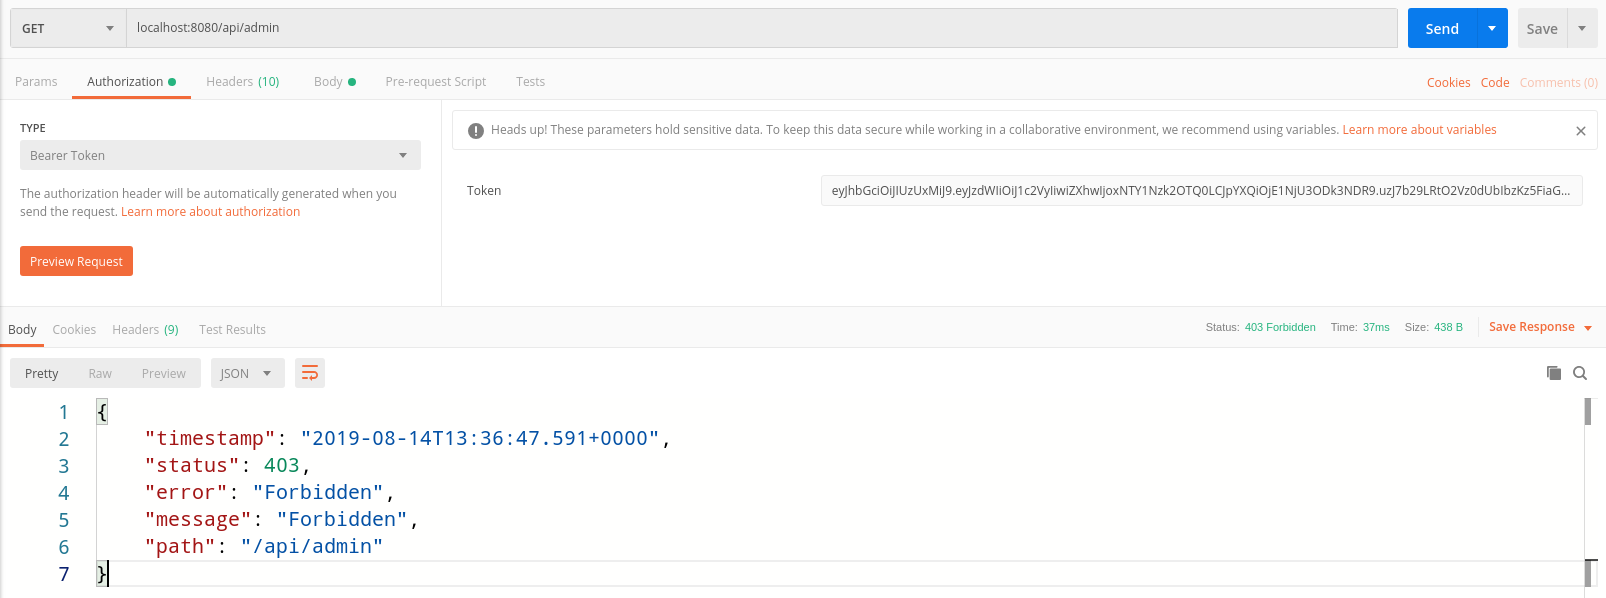
可以看到普通用户访问 localhost:8080/api/user 时被拒绝了。
demo地址:https://github.com/ShangguanHong/SpringBootDemo/tree/master/springboot-jpa
6. 参考资料
- 重拾后端之Spring Boot(四):使用 JWT 和 Spring Security 保护 REST API
- https://github.com/szerhusenBC/jwt-spring-security-demo/blob/master/src/main/java/org/zerhusen/model/security/Authority.java