1. 前言
在 Java 领域一般有 Spring Security、Apache Shiro 等安全框架,之前写了一篇关于 JWT整合Spring Security 的文章,里面介绍了使用 Spring Boot + JWT + Spring Security 来完成用户的登录与权限认证。
Spring Security 虽然强大,但是它过于的庞大与复杂并且与 Spring 的联系比较紧密,在实际开发中,大多数的公司会选择 Apache 的 Shiro 来使用,这篇文章来学习如何使用 Spring Boot 集成 Apache Shiro 。
具体内容可以查看 demo源码
2. 什么是Apache shiro
Apache Shiro 是一个功能强大、灵活的,开源的安全框架。它可以干净利落地处理身份验证、授权、企业会话管理和加密。
以下功能都是 Shiro 能够实现的:
-
验证用户身份
-
用户访问权限控制,比如:1、判断用户是否分配了一定的安全角色。2、判断用户是否被授予完成某个操作的权限
-
在非 Web 或 EJB 容器的环境下可以任意使用 Session API
-
可以响应认证、访问控制,或者 Session 生命周期中发生的事件
-
可将一个或以上用户安全数据源数据组合成一个复合的用户 “view”(视图)
-
支持单点登录(SSO)功能
-
支持提供“Remember Me”服务,获取用户关联信息而无需登录
…
下图为 Shiro 的功能框架图
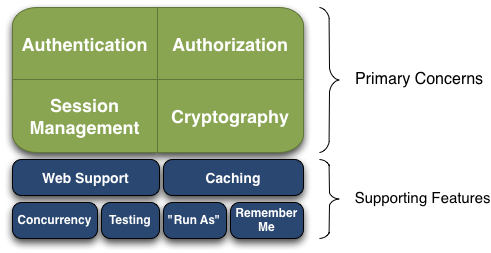
- **Authentication(认证):**用户身份识别,通常被称为用户“登录”,让系统知道你是谁
- **Authorization(授权):**访问控制。光让系统指知道你是谁还不够,还需要让系统知道你能干什么
- **Session Management(会话管理):**特定于用户的会话管理,甚至在非web 或 EJB 应用程序。
- **Cryptography(加密):**在对数据源使用加密算法加密的同时,保证易于使用。
还有其他的功能来支持和加强这些不同应用环境下安全领域的关注点。特别是对以下的功能支持:
- Web支持:Shiro 提供的 Web 支持 api ,可以很轻松的保护 Web 应用程序的安全。
- 缓存:缓存是 Apache Shiro 保证安全操作快速、高效的重要手段。
- 并发:Apache Shiro 支持多线程应用程序的并发特性。
- 测试:支持单元测试和集成测试,确保代码和预想的一样安全。
- “Run As”:这个功能允许用户假设另一个用户的身份(在许可的前提下)。
- “Remember Me”:跨 session 记录用户的身份,只有在强制需要时才需要登录。
注意: Shiro 不会去维护用户、维护权限,这些需要我们自己去设计/提供,然后通过相应的接口注入给 Shiro
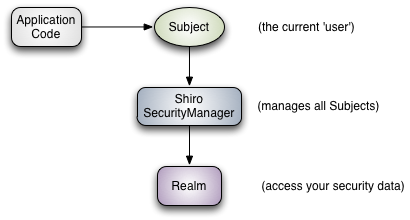
下面介绍以下 Shiro 的三个核心概念
- Subject:当前用户,Subject 可以是一个人,但也可以是第三方服务、守护进程帐户、时钟守护任务或者其它–当前和软件交互的任何事件。
- SecurityManager:管理所有的Subject,SecurityManager 是 Shiro 架构的核心,主要协调Shiro内部的各种安全组件
- Realm:用于进行权限信息的验证,我们自己实现。Realm 本质上是一个特定的安全 DAO:它封装与数据源连接的细节,得到Shiro 所需的相关的数据。在配置 Shiro 的时候,你必须指定至少一个Realm 来实现认证(authentication)和/或授权(authorization)。
下图为这三者的关系图
在 Spring Boot 中集成 Shiro 十分的简单,我们只需要实现两个类即可:一个是 ShiroConfig 类,一个是 MyRealm 类。
3. 前期准备
3.1 导入依赖
 1
 2
 3
 4
 5
 6
 7
 8
 9
10
11
12
13
14
15
16
17
18
19
20
21
22
23
24
25
26
27
28
|
<!-- shiro核心 -->
<dependency>
	<groupId>org.apache.shiro</groupId>
	<artifactId>shiro-spring</artifactId>
	<version>1.4.0</version>
</dependency>
<!-- lombok 简化pojo的书写 -->
<dependency>
	<groupId>org.projectlombok</groupId>
	<artifactId>lombok</artifactId>
	<optional>true</optional>
</dependency>
<!-- thymeleaf模板引擎 -->
<dependency>
	<groupId>org.springframework.boot</groupId>
	<artifactId>spring-boot-starter-thymeleaf</artifactId>
</dependency>
<!-- jpa -->
<dependency>
	<groupId>org.springframework.boot</groupId>
	<artifactId>spring-boot-starter-data-jpa</artifactId>
</dependency>
<!-- mysql驱动 -->
<dependency>
	<groupId>mysql</groupId>
	<artifactId>mysql-connector-java</artifactId>
	<scope>runtime</scope>
</dependency>
|
上面的核心是 shiro-spring坐标
3.2 配置文件
application.yml
 1
 2
 3
 4
 5
 6
 7
 8
 9
10
11
12
13
14
15
|
spring:
  datasource:
    url: jdbc:mysql://localhost:3306/demo
    username: root
    password: root
    driver-class-name: com.mysql.jdbc.Driver

  jpa:
    database: mysql
    show-sql: true
    hibernate:
      ddl-auto: update
    properties:
      hibernate:
        dialect: org.hibernate.dialect.MySQL5Dialect
|
3.3 测试页面
我们新建了六个页面用来测试:
- index.html :首页
- login.html :登录页
- userList.html : 用户信息页面
- userAdd.html :添加用户页面
- userDel.html :删除用户页面
- 403.html : 没有权限的页面
除过登录页面其它都很简单,大概如下:
 1
 2
 3
 4
 5
 6
 7
 8
 9
10
|
<!DOCTYPE html>
<html lang="en">
<head>
    <meta charset="UTF-8">
    <title>Title</title>
</head>
<body>
<h1>index</h1>
</body>
</html>
|
login.html
 1
 2
 3
 4
 5
 6
 7
 8
 9
10
11
12
13
14
15
16
17
18
19
|
<!DOCTYPE html>
<html lang="en" xmlns:th="http://www.w3.org/1999/xhtml">
<head>
    <meta charset="UTF-8">
    <title>Login</title>
</head>
<body>
错误信息:<h4 th:text="${msg}"></h4>
<form action="" method="post">
    <p>账号:<label>
        <input type="text" name="username" value="admin"/>
    </label></p>
    <p>密码:<label>
        <input type="text" name="password" value="123456"/>
    </label></p>
    <p><input type="submit" value="登录"/></p>
</form>
</body>
</html>
|
3.4 数据库内容
这里我们采用 RBAC 的权限模型来测试
RBAC 是基于角色的访问控制(Role-Based Access Control )在 RBAC 中,权限与角色相关联,用户通过成为适当角色的成员而得到这些角色的权限。这就极大地简化了权限的管理。这样管理都是层级相互依赖的,权限赋予给角色,而把角色又赋予用户,这样的权限设计很清楚,管理起来很方便。
采用 Jpa 技术来自动生成基础表格,对应的实体如下
SysUser.java:
 1
 2
 3
 4
 5
 6
 7
 8
 9
10
11
12
13
14
15
16
17
18
19
20
21
22
23
24
25
|
@Data
@Entity
public class SysUser implements Serializable {

    private static final long serialVersionUID = 2057675669846796336L;

    @Id
    @GeneratedValue(strategy = GenerationType.IDENTITY)
    private Integer id;

    @Column(unique = true)
    private String username;

    private String name;

    private String password;

    private Byte state;

    @ManyToMany(fetch = FetchType.EAGER)
    @JoinTable(name = "SysUserRole",
            joinColumns = {@JoinColumn(name = "u_id")},
            inverseJoinColumns = {@JoinColumn(name = "r_id")})
    private List<SysRole> roleList;
}
|
SysRole.java:
 1
 2
 3
 4
 5
 6
 7
 8
 9
10
11
12
13
14
15
16
17
18
19
20
21
22
23
24
25
26
|
@Data
@Entity
public class SysRole implements Serializable {

    private static final long serialVersionUID = -3276415633649319106L;

    @Id
    @GeneratedValue(strategy = GenerationType.IDENTITY)
    private Integer id;

    private String role;

    private String description;

    private Boolean available = Boolean.FALSE;

    @ManyToMany(fetch = FetchType.EAGER)
    @JoinTable(name = "SysRolePermission",
            joinColumns = {@JoinColumn(name = "r_d")},
            inverseJoinColumns = {@JoinColumn(name = "p_id")})
    private List<SysPermission> permissionList;

    @JsonIgnore
    @ManyToMany(mappedBy = "roleList")
    private List<SysUser> userList;
}
|
SysPermission.java:
 1
 2
 3
 4
 5
 6
 7
 8
 9
10
11
12
13
14
15
16
17
18
19
20
|
@Data
@Entity
public class SysPermission implements Serializable {

    private static final long serialVersionUID = 5877361065104918109L;

    @Id
    @GeneratedValue(strategy = GenerationType.IDENTITY)
    private Integer id;

    private String name;

    private String permission;

    private Boolean available = Boolean.FALSE;

    @JsonIgnore
    @ManyToMany(mappedBy = "permissions")
    private List<SysRole> roleList;
}
|
根据以上的代码会自动生成 sys_user(用户信息表)、sys_role(角色表)、sys_permission(权限表)、sys_user_role(用户角色表)、sys_role_permission(角色权限表)这五张表,为了方便测试我们给这五张表插入一些初始化数据:
 1
 2
 3
 4
 5
 6
 7
 8
 9
10
11
12
13
14
15
16
17
18
19
20
21
22
23
|
INSERT INTO `sys_user` (`id`, `name`, `password`, `state`, `username`) VALUES
	(1, 'admin', 'admin', 1, 'admin'),
	(2, 'user', 'user', 'user', 1, 'user');

INSERT INTO `sys_role` (`id`, `role`, `description`, `available`) VALUES
	(1, 'admin', '管理员', b'1'),
	(2, 'vip', 'VIP会员', b'1');

INSERT INTO `sys_permission` (`id`, `name`, `permission`, `available`) VALUES
	(1, '用户管理', 'user:view', b'1'),
	(2, '用户添加', 'user:add', b'1'),
	(3, '用户删除', 'user:del', b'1');

INSERT INTO `sys_user_role` (`u_id`, `r_id`) VALUES
	(1, 1),
	(1, 2),
	(2, 2);

INSERT INTO `sys_role_permission` (`r_d`, `p_id`) VALUES
	(2, 2),
	(1, 3),
	(1, 1),
	(1, 2);
|
4. 编写ShiroConfig与MyRealm
4.1 ShiroConfig
首先要配置的是 ShiroConfig ,Apache Shiro 核心通过 Filter 来实现, 既然是使用 Filter 一般也就能猜到,是通过 URL 规则来进行过滤和权限校验,所以我们需要定义一系列关于 URL 的规则和访问权限。
最简单的 ShiroConfig 定义如下
 1
 2
 3
 4
 5
 6
 7
 8
 9
10
11
12
13
14
15
16
17
18
19
20
21
22
23
24
25
26
27
28
29
30
31
32
33
34
35
36
37
38
39
40
41
42
43
44
|
@Configuration
@Slf4j
public class ShiroConfig {

    @Bean
    public ShiroFilterFactoryBean shiroFilter(SecurityManager securityManager) {
        log.debug("ShiroConfig-------------------------->shiroFilter()");
        ShiroFilterFactoryBean shiroFilterFactoryBean = new ShiroFilterFactoryBean();
        shiroFilterFactoryBean.setSecurityManager(securityManager);
        // 如果不设置默认会自动寻找Web工程根目录下的"/login.jsp"页面
        shiroFilterFactoryBean.setLoginUrl("/login");
        // 登录成功后要跳转的链接
        shiroFilterFactoryBean.setSuccessUrl("/index");
        // 未授权界面;
        shiroFilterFactoryBean.setUnauthorizedUrl("/403");
        // 拦截器
        Map<String, String> filterChainDefinitionMap = new LinkedHashMap<>();
        // <!-- authc:所有url都必须认证通过才可以访问; anon:所有url都都可以匿名访问-->
        // 配置不会被拦截的链接 顺序判断
        // 静态文件运行访问
        filterChainDefinitionMap.put("/static/**", "anon");
        // 登录接口允许访问
        filterChainDefinitionMap.put("/login", "anon");
        // 配置退出过滤器,其中的具体的退出代码Shiro已经替我们实现了
        filterChainDefinitionMap.put("/logout", "logout");
        // 剩余的都需要认证
        // 主要这行代码必须放在所有权限设置的最后,不然会导致所有 url 都被拦截
        filterChainDefinitionMap.put("/**", "authc");
        shiroFilterFactoryBean.setFilterChainDefinitionMap(filterChainDefinitionMap);
        return shiroFilterFactoryBean;
    }

    @Bean
    public SecurityManager securityManager() {
        DefaultWebSecurityManager securityManager = new DefaultWebSecurityManager();
        securityManager.setRealm(myRealm());
        return securityManager;
    }

    @Bean
    public MyRealm myRealm() {
        return new MyRealm();
    }
}
|
-
shiroFilter
-
shiro的过滤器,可以设置登录页面(setLoginUrl)、权限不足跳转页面(setUnauthorizedUrl)、登录成功后的页面(setSuccessUrl)、具体某些页面的权限控制或者身份认证。
-
一个URL可以配置多个 Filter,使用逗号分隔。
-
当设置多个过滤器时,全部验证通过,才视为通过。部分过滤器可指定参数,如 perms,roles。
-
这里面需要指定 securityManager
简单来说就是比如在shiro配置文件中添加了filterChainDefinitionMap.put(“/add”, “perms[/add]”);就说明访问/add这个链接必须要有“/add”这个权限才可以访问,如果在shiro配置文件中添加了filterChainDefinitionMap.put(“/add”, “roles[2],perms[/add]”);就说明访问/add这个链接必须要有“/add”这个权限和具有“2”这个角色才可以访问。
-
securityManager
- 由于项目是一个web项目,所以我们使用的是
DefaultWebSecurityManager
- 这里面需要指定realm,即我们自己写的MyRealm
-
myRealm: 我们自己写的登录与权限认证器
4.2 MyRealm
自定义的 Realm 继承 AuthorizingRealm,并且重载 doGetAuthorizationInfo 和 doGetAuthenticationInfo 两个方法。
doGetAuthenticationInfo:身份认证,通过账号和密码验证当前 Subject 的身份是否合法
doGetAuthorizationInfo: 权限认证,获取登录成功的 Subject 的所属权限
 1
 2
 3
 4
 5
 6
 7
 8
 9
10
11
12
13
14
15
16
17
18
19
20
21
22
23
24
25
26
27
28
29
30
31
32
33
34
35
36
37
38
39
|
@Slf4j
public class MyRealm extends AuthorizingRealm {

    @Resource
    private SysUserRepository sysUserRepository;

    @Override
    protected AuthorizationInfo doGetAuthorizationInfo(PrincipalCollection principalCollection) {
        log.debug("UserRealm------------------->doGetAuthorizationInfo");
        SimpleAuthorizationInfo authorizationInfo = new SimpleAuthorizationInfo();
        // 1. 通过principalCollection.getPrimaryPrincipal()得到传入的用户信息
        SysUser user = (SysUser) principalCollection.getPrimaryPrincipal();
        // 2. 遍历Role集合 赋予角色
        for (SysRole role : user.getRoleList()) {
            authorizationInfo.addRole(role.getRole());
            // 2. 遍历Permission集合 赋予权限
            for (SysPermission p : role.getPermissionList()) {
                authorizationInfo.addStringPermission(p.getPermission());
            }
        }
        return authorizationInfo;
    }

    @Override
    protected AuthenticationInfo doGetAuthenticationInfo(AuthenticationToken authenticationToken) throws AuthenticationException {
        log.debug("UserRealm---------------->doGetAuthenticationInfo");
        // 1. 把AuthenticationToken转换为UserToken
        UsernamePasswordToken token = (UsernamePasswordToken) authenticationToken;
        // 2. 从UserToken中获取username
        String username = token.getUsername();
        // 3. 若用户不存在,抛出UnknownAccountException异常
        SysUser user = sysUserRepository.findByUsername(username);
        if (user == null) {
            throw new UnknownAccountException("用户不存在!");
        }
        // 4. 根据用户的情况,来构建AuthenticationInfo对象并返回,通常使用的实现类为SimpleAuthenticationInfo
        return new SimpleAuthenticationInfo(user, user.getPassword(), getName());
    }
}
|
权限配置可以直接添加一整个 set 集合进去,如
1
2
|
authorizationInfo.setRoles(roles);
authorizationInfo.setStringPermissions(stringPermissions);
|
使用遍历的方法可以更加精细的控制权限配置,比如这里可以加上对 available 字段的使用
5. 编写Controller
新建一个 HomeIndexController
 1
 2
 3
 4
 5
 6
 7
 8
 9
10
11
12
13
14
15
16
17
18
19
20
21
22
23
24
25
26
27
28
29
30
31
32
33
34
35
36
37
38
39
40
41
42
43
|
@Controller
@Slf4j
public class HomeIndexController {

    @RequestMapping({"/", "/index"})
    public String index() {
        return "/index";
    }

    @RequestMapping(value = "/login")
    public String login(@RequestParam(value = "username", required = false) String username, @RequestParam(value = "password", required = false) String password) {
        if (username == null || password == null) {
            return "/login";
        }
        log.debug("HomeController------------------------->login()");
        // 1. 从SecurityUtils里边创建一个 subject
        Subject subject = SecurityUtils.getSubject();
        UsernamePasswordToken token = new UsernamePasswordToken(username, password);
        try {
            // 2. 执行认证登陆,没抛出异常则代表认证成功
            subject.login(token);
        } catch (UnknownAccountException uac) {
            log.debug("UnknownAccountException -- > 账号不存在:");
        } catch (IncorrectCredentialsException ice) {
            log.debug("IncorrectCredentialsException -- > 密码不正确:");
        } catch (AuthenticationException ae) {
            log.debug("AuthenticationException -- > 用户名或密码不正确:");
        } catch (Exception e) {
            log.debug("未知错误");
        }
        // 3. 判断该subject是否为已经认证过的
        if (subject.isAuthenticated()) {
            return "redirect:/index";
        } else {
            return "/login";
        }
    }

    @RequestMapping("/403")
    public String unauthorized() {
        return "/403";
    }
}
|
启动项目,访问浏览器 localhost:8080/login ,输入正确的账号密码就进入 index.html 页面,这里也可以试下输入错误的账号密码观察下控制台的日志打印情况,来确保只有输入正确的账号密码才能登录成功。
能成功登录后,需要做的就是给每一个需要权限的接口配置相应的权限了。
6. 配置接口权限
给每个接口配置对应的权限有两种方法,一种就是前面提到过的在 ShiroConfig 中的 shiroFilter 方法内,使用 perms 与 roles 来给对应的接口配置相应的权限与角色,但是这种方法对于接口数量多并且权限控制复杂的项目使用起来不是那么的顺手。这个时候就可以使用第二种方法了:在每一个接口上面配置相应的权限注解即可。
在使用注解配置权限之前,我们先需要开启注解功能,在 ShiroConfig 中加入下面的代码即可
 1
 2
 3
 4
 5
 6
 7
 8
 9
10
|
    /**
     * 开启shiro aop注解支持
     * 使用代理方式,所以需要开启代码支持
     */
    @Bean
    public AuthorizationAttributeSourceAdvisor authorizationAttributeSourceAdvisor(SecurityManager securityManager) {
        AuthorizationAttributeSourceAdvisor authorizationAttributeSourceAdvisor = new AuthorizationAttributeSourceAdvisor();
        authorizationAttributeSourceAdvisor.setSecurityManager(securityManager);
        return authorizationAttributeSourceAdvisor;
    }
|
我们新建一个 UserController 来使用一下权限注解
 1
 2
 3
 4
 5
 6
 7
 8
 9
10
|
@Controller
@RequestMapping("/user")
public class UserController {

    @GetMapping("/list")
    @RequiresPermissions("user:view") // 只有拥有 user:view 权限的用户才能访问此接口
    public String showUser() {
        return "/userList";
    }
}
|
刚开始未登录时,浏览器输入 localhost:8080/user/list,页面会跳转到 localhost:8080/login 让用户登录,登录成功后再输入 localhost:8080/user/list 则可以显示 userList.html 页面
修改 admin 用户的权限重新登录试下权限处理是否成功
登录后想切换用户,需要在浏览器输入 localhost:8080/logout 来退出当前登录的用户,否则会一直处于之前的登录状态
7. 加密密码
到此为止,关于用户登录、用户权限认证的相关操作都已完成,但是相信大家也发现了,在这之前我们登录的时候输入的密码与数据库中的密码是直接对应的,这是非常的不安全的。前面提到过了 Shiro 中有 Cryptography (加密)组件可以供我们使用,下面就来看下如何在shiro中使用加密算法对我们的密码进行加密保护。
首先在 ShiroConfig 中加入如下代码
 1
 2
 3
 4
 5
 6
 7
 8
 9
10
11
12
13
14
15
16
17
18
19
20
21
22
23
24
25
26
|
    /**
     * 凭证匹配器
     * (由于我们的密码校验交给Shiro的SimpleAuthenticationInfo进行处理了
     * )
     *
     * @return HashedCredentialsMatcher
     */
    @Bean
    public HashedCredentialsMatcher hashedCredentialsMatcher() {
        HashedCredentialsMatcher hashedCredentialsMatcher = new HashedCredentialsMatcher();
        //散列算法:这里使用MD5算法;
        hashedCredentialsMatcher.setHashAlgorithmName("md5");
        //散列的次数,比如散列两次,相当于 md5(md5(""));
        hashedCredentialsMatcher.setHashIterations(2);
        // storedCredentialsHexEncoded默认是true,此时用的是密码加密用的是Hex编码;false时用Base64编码
        hashedCredentialsMatcher.setStoredCredentialsHexEncoded(true);
        return hashedCredentialsMatcher;
    }

    @Bean
    public MyRealm myRealm() {
        MyRealm myRealm = new MyRealm();
        // 告诉realm,使用hashedCredentialsMatcher加密算法类来验证密文
        myRealm.setCredentialsMatcher(hashedCredentialsMatcher());
        return myRealm;
    }
|
在这里我们首先创建一个 hashedCredentialsMatcher,这里面指定了加密算法、散列次数以及编码方式。
然后修改我们之前的 myRealm,将 realm 的凭证匹配器设置为我们自定义的 hashedCredentialsMatcher
流程如下:
注册时,先将密码通过 Shiro 提供的 SimpleHash 帮助加密,这里的 salt 需要保存到数据库,解密的时候需要它
1
2
3
4
5
6
7
|
    public static String encryption(String password, String salt) {
        // 加密算法 MD5
        // salt = username + salt
        // 迭代次数 2
        return new SimpleHash("MD5", password,
                ByteSource.Util.bytes(salt), 2).toHex();
    }
|
然后在我们验证的时候交给 Shiro 的 SimpleAuthenticationInfo 进行处理
 1
 2
 3
 4
 5
 6
 7
 8
 9
10
11
12
13
14
15
16
17
18
|
    @Override
    protected AuthenticationInfo doGetAuthenticationInfo(AuthenticationToken authenticationToken) throws AuthenticationException {
        log.debug("UserRealm---------------->doGetAuthenticationInfo");
        // 1. 把AuthenticationToken转换为UserToken
        UsernamePasswordToken token = (UsernamePasswordToken) authenticationToken;
        // 2. 从UserToken中获取username
        String username = token.getUsername();
        // 3. 若用户不存在,抛出UnknownAccountException异常
        SysUser user = sysUserRepository.findByUsername(username);
        if (user == null) {
            throw new UnknownAccountException("用户不存在!");
        }
        // 4. 根据用户的情况,来构建AuthenticationInfo对象并返回,通常使用的实现类为SimpleAuthenticationInfo
        return new SimpleAuthenticationInfo(user,
                user.getPassword(),
                ByteSource.Util.bytes(user.getSalt()),
                getName());
    }
|
注意这里的 new SimpleAuthenticationInfo 后加了 ByteSource.Util.bytes(user.getSalt())
密码加密需要注意的点就是:
- 注册的加密方式和设置的加密方式要一致(md5)
- 散列的次数要一致(2次)
- salt要保持一致(保存到数据库中)
9. 参考资料
- Spring Boot (十四): Spring Boot 整合 Shiro-登录认证和权限管理
- SpringBoot2.0集成Shiro